TRIKE FRAMES-SEATS ‘N’ STUFF. PART 5

Home
/ Forum / Pictures / Bikes / Trikes / HotRods

Page 1
Page 2
Page3
Page 4
Page 5
Page 6
Page 7


TRIKE FRAMES-SEATS ‘N’ STUFF. PART 5.

Good morning class. Are we all here? Right. Open your books to chapter 5 -& pay attention at the back -I’ll be asking questions later.
Everybody sitting comfortably? Then we’ll begin.
In the opening paragraph we find our impossibly handsome & erudite young hero deep in the vast caverns of the Manky Monkey garage, surveying the skeletal steel sculpture that has haunted his dreams these past few weeks. A frown creased his perfectly honed brow. Something was missing. “I need somewhere to perch me arse” he mused.
O.K, now we’ve knocked up the basic outline of our trike frame, it’s time to start adding some of the secondary tube-work. First up is the seat frame & luggage rack. We’re using a large universal fitting solo seat, bought for 40 quid from the

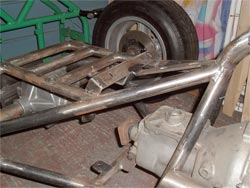
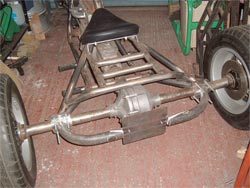
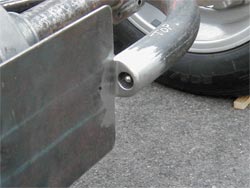
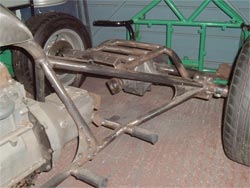
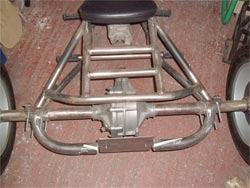
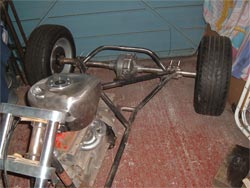
Netley Marsh auto jumble last year, coupled with a home-made removable pillion pad that’ll clip onto the luggage rack. The rack is an integral part of the frame &, following the Manky ethos, is minimal & dual purpose. As well as providing luggage & pillion carrying space, it also ties the two axle clamps together to stop them spreading & braces the rear of the frame from front to back. We used a length of our 1” tube, with a 45 degree bend at either end, to bridge across from one axle clamp to the other, rising up over the diff housing & welded to the frame just ahead of the clamps.
 
From this we then ran a pair of tubes forward, parallel to the ground, to meet the nose of the “hardtail”, (the name given to an unsprung frame by we custom bike dudes). With a little careful measuring, & a lot of luck, these tubes are the same width
as the rider’s saddle so tuck neatly under the back of it. The rear loop also has to be just the right height to achieve this while keeping the rack horizontal. Have a look at the photos to see what I mean. A couple of short tubes were then cut, scalloped & tapped into place to form a platform. A quick check with the engineer’s square & everything was tack welded together. We now have a luggage rack/pillion seat mount that also substantially braces the rear of the frame.
 
When we originally set out our frame dimensions we didn’t just bung the axle clamps on any old where & hope for the best. No, we’re much cleverer than we look. When the rider’s pad is fitted it’s edges follow the line of the hardtail down to the
clamps. Smooth, uncluttered, flowing lines. See, told you those few hours spent moving components around on the garage floor would be worth it. The saddle has four mounting studs on it’s underside, so some off-cuts of 2” wide flat steel strap were fashioned into a seat support & fitted to the frame.
 
I’ve been keen to try out an idea for a number plate mount for a while now, so we’ve used it here, just to be a little different from Darren’s orange trike. I took a length of the 1 ½” bore material we used for the top tube, added a 90 degree bend at
either end & created a “bumper” tube around the back of the axle. This is welded to the rear half of the axle clamps so they now bolt to the frame as a one-piece unit, further bracing the hardtail. A section was then cut out of the centre of the bumper & a 3mm thick steel number plate mount was welded in place. This has captive M6 nuts welded behind it to screw the plate to. Notice the two parallel lines of perfect weld penetration on the face of the plate -damn I’m good!
 
Several number plate lights were tried before the final solution was found. Quite chuffed with these actually. At the moment, all the shaven headed, baseball hatted numbskulls are adorning their clapped out hatch-backs with little blue LED lights. These are basically a hollow M6 bolt with a small but very bright LED mounted in the head so they can be fitted into a hole
drilled in the car’s bodywork & held with a nut from the back. After a little shopping around I managed to find a pair of white ones. I welded an M6 nut to a washer then into the end of an offcut of 1” Tube. These were then welded in place on either side of the number plate giving recessed housings that the LEDs screw directly into. The wires travel inside the bumper & exit through holes near the axle clamps. A very neat & subtle set-up that only cost 7 quid for the lights & a bit of time with the welder, hand file & bits of scrap tube. Just wait -everyone will be nicking that idea next year!
 
Lastly for today, we need some footpegs. The rubbers were bought from a spares catalogue & are pattern BSA items. They mount on a square bar roughly ½” thick, but to achieve this we had to weld two flat pieces together ‘cos that’s all we
had knocking about in the garage at the time. After much experimenting with our trusty old paint tins to find the optimum comfy riding position for Simon’s little legs, ½” holes were drilled in the frame rails & the square bars welded in place. Hmm, I guess they must be the square pegs in round holes you hear about. To space the rubbers out from the frame to the desired width, sleeves of 1” tube were cut & slid over the pegs, welded to them & to the frame. Hopefully that’ll give a nice solid finished footpeg. The pillion pegs were made in exactly the same way & positioned to line up with the gearbox cross member, simply because they looked right there.
 
So that’s about it for another week. All the tubing is now done. A quick measure up shows we’ve used about 32 feet of 1” bore grade 3 ERW & 6 or 7 feet of 1 ½” bore. Add the cost of the gas & wire for the MIG welder & the basic frame has
come to around 100 quid so far. Plus my welding, fabricating, tutorial & journalistic fees of course! Don’t suppose any of you lot brought a cake for the teacher? No, thought not. Very partial to jammy doughnuts you know. And it IS my Birthday next week. Oh well.
Next time we’ll run through the various mounting tabs & add a few strengthening gussets. I hope these lessons show that even the most complicated looking designs are just a matter of lots of forward planning, a bit of imagination & taking it one small step at a time.
Class dismissed.