TRIKE FRAMES - AN IDIOT’S GUIDE. PART ONE.
Home / Forum / Pictures / Bikes / Trikes / HotRods

Page 1
Page 2
Page3
Page 4
Page 5
Page 6
Page 7
 

TRIKE FRAMES - AN IDIOT’S GUIDE. PART ONE.
(Click Pictures For Larger Image).

Written in 2005

Hi. Andy Field here & I’ll be your idiot for today.
I’ve been riding 3 wheelers on & off for about 15 years now. Built 7 of my own so far & had a hand in half a dozen more. Got a shelf full of trophies in my garage & had 5 of my creations featured in national bike magazines -God that sounds big-headed doesn’t it! Not meant to be. I just like the artistic/creative side of building bikes & get a kick out of riding something I’ve literally built with my own hands from the ground up.
I’ve just pulled my own green Reliant Rialto engined beastie to bits & sold the frame to a friend. Been cruising around on it for nearly 4 years & just fancied a change. Nothing drastic, just simpler & tidier, re-using as many original parts as I can. At the same time as rebuilding my own & helping the new owner resurrect the old one, I’m also putting together 2 more. Number 1 is Darren’s VERY orange thing, as featured in Back Street Heroes magazine. This is the basic frame layout we’re using on all of them. A very simple “hardtail” or “rigid” setup. No rear suspension! Not as mad as it sounds -honest! Most trike riders run their rear tyres at only 10 to 15 PSI. Mine are 15. The lack of weight on small trikes means they become very skittery if the tyres are any harder & can lead to bump-steer, where hitting a bump with the back wheel throws the front end to one side. Softer tyres obviously also mean a softer ride. Most modern roads aren’t actually THAT bad & riding a hardtail is more a series of gentle bumps than spine shattering crunches. It’s just a different style of riding. More basic but also a lot more fun!
O.K, intro over. Time to build something.
I haven’t even started on my own new frame yet, so I’ll take the next one along the production line as an example. My mate Simon is also a Postie, although at a different Sorting Office to Darren & myself. He’s been riding sports bikes for the last few years & reached the point where he wants to slow down before he kills himself! Always had an interest in custom bikes but never built anything himself. He's...erm, vertically challenged, so small, lightweight & minimalist is the way to go.

Click Picture For Larger Image
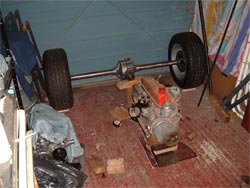
I had a few Reliant spares in my garage so we started with a Robin axle. To this we added a pair of 14” 5 spoke “Revolution” wheels that had previously graced a Ford Capri. I’d already refurbished them, having the oxidisation shot-blasted off, then powder-coating them in metallic silver, before spray-painting the spokes gloss black. 205, 60 profile tyres give an overall diameter of something like 23”. Being intended for a Ford they had a 4 x 4 ¼ PCD. 4 bolt holes spaced 4 ¼” apart measured diagonally across the bolt centres. Reliant axles use 4 x 4” so I had Doug, my local friendly engineering chappie, machine up some adaptors. These are steel rings, 1” thick, that have Reliant pattern studs sticking out of the front, & Ford pattern bolt holes at the back.
   
With the wheels & tyres on the axle, this then gives the height of the diff’ housing, (the differential gears in the centre of the axle), from the ground. To that bolts the prop’ shaft, which runs parallel to the ground & connects to the gearbox, which bolts to the engine. So the height of the rear tyres determines the height of the engine in the finished frame. Easy. On Simon’s he should end up with about 5” of ground clearance under his sump. I’ve got a dummy engine & gearbox, put together from empty casings, which is a lot easier to lug about & move into position than a “full” motor. So a happy few hours are spent propping all the components up on bits of wood, old paint cans & anything else that comes to hand, working out the basic dimensions of the thing. How far back from the headstock will the tank come? How much room do you need for the seat? What about the pillion? Where should the footpegs go?
We’re using a front end built from all my old spares, which means Ducati 900SS forks & a Honda Superdream wheel, held in 1 ½” thick aluminium yokes, with a one-off stainless wheel spindle, again machined by Doug for the extortionate fee of 60 quid the lot.
Click Picture For Larger Image
The stainless steering stem is turned to fit Kawasaki GPZ 600 bearings, simply because that’s what Darren’s front end is & we had the bearings to hand at the time! Setting the rake & trail of the forks took all of 5 minutes -prop ‘em in place & see what looks right! As a general rule of thumb, if it looks O.K, it usually is. The yokes have to be far enough forward to clear the tank on full lock & high enough to allow the top tube that runs beneath the tank to meet the headstock. These machines are deliberately low tech. A few basic measurements to ensure everything runs true & square & the rest is down to a keen eye & sense of proportion, coupled with a few year’s experience of what will work in practice. I usually spend an afternoon or so, just moving things about, trying different ideas until it looks right.

O.K, that’s more than enough for now I think. With luck there’s a piccie here somewhere of Simon riding his air trike. Next time we’ll start bending some tubing around the assembled bits & pieces so don’t knock anything over on your way out.