A good solder joint is the strongest way to connect wires together. It can also be used to connect wires to components. When done properly the joint is electrically sound almost for ever. The only way to interrupt the electrical flow is to de-solder the connection, (or to cut the wire).
To make a solder connection you will need a few tools-
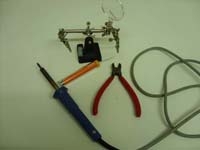
The soldering iron-
mine is a 25 watt mains powered soldering iron. You can get gas powered irons and 12 volt soldering irons as well.
A set of automatic wire strippers-
any kind of wire strippers will do, I just find these easiest to use.
A pair of wire cutters-
the automatic wire strippers have a wire cutter function, but I just prefer to trim the ends of bared wires with these small cutters.
The solder-
it's pretty bog standard electrical solder. A reel should cost about a tenner, but you can get smaller amounts.
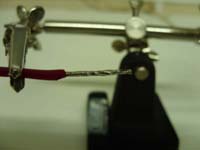
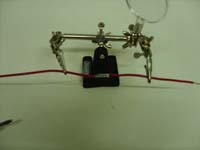
One tool that can be handy to have is an extra set of hands. You really need 4 hands to solder, (1 to hold the iron, 1 to feed the solder, and 2 to hold the wires together before, during and after you've made the solder joint).
A helping hand tool is a weighted base, with an adjustable cross bar. Attached to the ends of this bar are crocodile clips. You use the clips to hold the wires in place while you use your real hands to do the soldering.
Plug the soldering iron in or light it if it’s a gas powered model. After a few minutes it will get up to temperature. You can test this by pushing some solder onto the end of the tip -when it melts easily, it's ready to work.
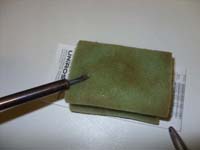
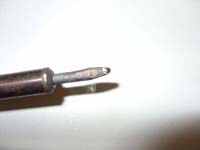
You need to tin the end of the tip to allow the heat to transfer to the wire to be soldered easily. You do this by applying a little bit of solder to the end of the tip. Flick the excess off, (a sharp flick of the iron aiming the tip at something to catch the molten solder is all that's needed. Excess solder will be shaken off). Then wipe the end of the tip with the solder you just put on, quickly, across a damp sponge. The sponge will sizzle as you do this and the solder will be cleaned off. This takes impurities off the tip that will bugger your joints up. Then put a tiny amount of fresh solder back on the tip. This keeps it wet and helps transfer heat to the cold wire you'll be touching it on soon.
Only the very end of the tip gets used. You should re-wet the tip every now and again as you work and whenever you notice black deposits on the end of the tip re-tin it, (wipe it clean with the sponge, put some solder on the tip, flick the excess off, wipe it across a damp sponge and put a tiny amount of fresh solder on the tip). If solder is left on the tip for too long it will scorch. It'll be a slightly yellow colour. Just wipe the tip on the sponge, and re-apply a small amount of fresh solder. The tip will accumulate excess solder each time you solder a wire, so you'll have to keep removing the excess. Not keeping the tip wet is probably the most common mistake made be people new to soldering. The iron will work without tinning the tip, but it won’t transfer all the heat to the item being soldered quickly. You only need a tiny amount of solder for the tip to be wet remember -too much and it'll drip off on things you'd rather not have molten solder on.
Next you need to tin the wires to be soldered. This is for the same reason as you tin the tip of the soldering iron. It helps conduct heat quickly, which helps get the conductors up to the melting point of the solder quickly and before the insulation starts to melt.
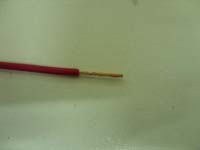
To tin the wires, first strip back about 15mm of insulation, twist the strands of wire together and find a way to hold the wire. The helping hand tool is handy when the wires are able to be laid on a bench, but when soldering wires that are already on a vehicle, you'll have to be inventive in finding ways to wedge the wire in place.
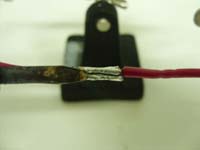
Once the wire is wedged in place, (or held by the helping hands tool, or your other half who trusts you not to solder their hands instead of the wire), you touch the wetted tip of the iron on the bare wire, don't get too close to the insulation as it will melt and you'll get impurities on the iron’s tip which will need cleaning off, (tin and wet it). Apply the solder to the wire, (the wire, not the tip of the iron. You need the wire to be hot enough to melt the solder, the tip is already hot). Solder will flow to the heat -the tip of the iron, so apply the solder to the part of the wire furthest away from the tip first, as that will be the last area to get up to temperature, then move the solder swiftly up towards the tip.
When you get to the tip with the solder, pull the solder away from the wire and move the iron away from the wire in a motion that follows the direction the wire is pointing, the draws excess solder away with the iron, and doesn't leave a spike of solder sticking out sideways as usually happens if you pull the iron away from the wire at 90 degrees to the wire. Do the same to all the wires you'll be soldering together, then you just have to actually solder them to each other.
Now you've tinned the wires, you can finally get round to joining them together. Soldering, like most things, is 50% preparation. To solder the wires together, you need to do a few things correctly. You need to hold the wires together before, during and after you solder. This is important -if the wires are moved while the solder is solidifying, you'll get a dry joint. This is when the solder solidifies around the wire, and not with it, allowing the wires to come apart as they are not bonded together properly. The second thing that's needed for a good solder joint is the temperature of the wires. They must both be the same temperature for the solder to bond to them both. That is the biggest mistake first time solderers make. If one wire is cooler than the other, (a common mistake is heating up one wire, placing the second one against the first wire, slapping a blob of solder on and removing the iron. The solder will bond to the hot wire, and just flow around the cooler wire, similar to a dry joint).
Here's how to solder 2 wires together
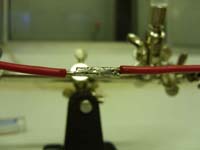
First, you need to hold the 2 bared and tinned ends of the wires together. You can get someone else to hold them, wedge them, or use the helping hands tool. Whatever method you use, you will need to hold the wires still for at least 5 seconds after you have removed the iron from the joint. This is how long it takes for the heated wires to cool down and allow the solder to solidify. Any movement of the wires away from each other at this time will weaken the joint.
Apply the hot soldering iron to the 2 wires, allowing the solder on the wires from tinning to melt. This will begin to bond the 2 wires together. Once the wires are BOTH hot enough, (the tin has begun to flow towards the tip of the iron), apply some more solder.
Remember that the solder will flow towards heat, i.e. the tip of the iron. When the joint is covered by solder, remove the solder wire. You don't need any more solder on the joint than is necessary -too much and it will form a sharp spike when you take the iron away. I like to quickly wipe the iron along the length of the joint and then pull the iron away. This helps ensure the whole joint is heated evenly and seems to reduce the spike of solder that usually results when you remove the iron.
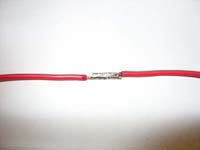
Remember to leave the joint still for at least 5 seconds after removing the iron, so the solder sets and bonds both wires together. The solder should be nice and shiny, indicating a good electrical and mechanical joint. Give the wires a good tug to see if they will come apart. A proper solder joint will be stronger than the wire, so you will not be able to pull it apart. Test it to make sure, as if it does come apart, you can re-solder it there and then, rather than having to do it in 6 months time when it's wrapped up in a loom.
Hopefully you have an idea how to make a good solder joint now. It's not hard, but things can go wrong, it's almost always a dry joint to blame, so you must make sure not to wiggle the wires about while the solder is setting and do not blow on the joint to try and cool it down quicker. A dry joint caused by the wires being moved before the solder has fully set usually looks dull and it will of course come apart when you tug on it. The most common mistake is not getting the 2 items being soldered up to the same temperature. This is most usually caused by applying the heat to one of the wires only and applying the solder directly to the tip of the iron. Remember that solder is drawn to heat, so applying the solder to the tip of the iron just puts it where it wants to go -you need to make the solder get to the iron by flowing around and through the strands of wire.
-Tbone